The FantaSim Tales Editing Mesh File Tutorial Site Map Home Return to tutorial table of contents
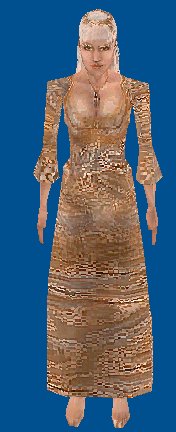
 B645FAFit_ B695FCchd_
JVDPR_nightdress2 sisblueFchild
Textures by Sistergirl
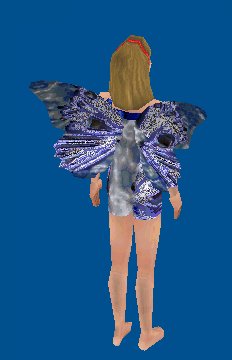
B645FAFit_                       B695FCchd_
JVDPR_nightdress2         sisblueFchild

Textures by Sistergirl
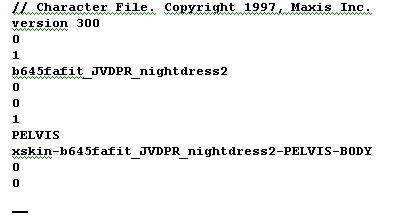
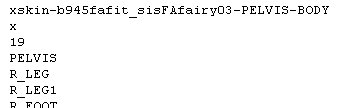
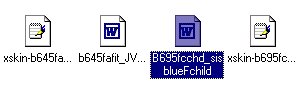 Since I will not need the Pelvis-Body mesh file for B695,
I only copied the .cmx and the xskin-695Fcchd_sisblueFchild_
NECK-WING file and pasted them with both of the B645 files.
Since I will not need the Pelvis-Body mesh file for B695,
I only copied the .cmx and the xskin-695Fcchd_sisblueFchild_
NECK-WING file and pasted them with both of the  B645 files.
Step 2
Adding The Wing Mesh Component To The Body .CMX File
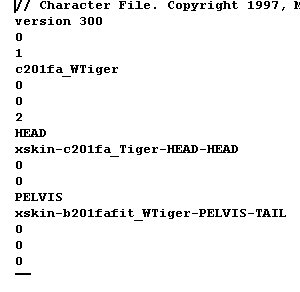
1. I open the B695 .cmx file. I only need the Neck attachment which contains the wings info
from this file. In order to have the correct file format, I highlight the entire wing xskin file
lines, right click my mouse on it, and select COPY.
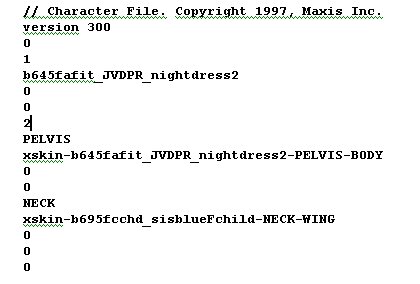
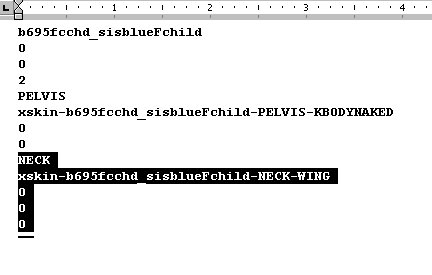 2. Next, I open the B645 .cmx file. I need to add the Neck-Wing lines, but I must first delete
the third zero under the Pelvis line; i.e., line 11. This is where the Neck-Wings lines will be
pasted, changing line 11 from 0 to NECK, and adding four more lines to the .cmx file.
2. Next, I open the B645 .cmx file. I need to add the Neck-Wing lines, but I must first delete
the third zero under the Pelvis line; i.e., line 11. This is where the Neck-Wings lines will be
pasted, changing line 11 from 0 to NECK, and adding four more lines to the .cmx file.
 Step 3
Renaming The Lines In The .CMX File
After I paste the Neck-Wings lines, it's time to edit the .cmx file.
1. First I change line 6 to indicate the number of xskin files that are now associated with this
new mesh. This is VERY IMPORTANT, because if you forget to change this number, the
new mesh can not be read, and your game will crash. This is why I always do this FIRST!
Since this .cmx now contains a Pelvis and Neck xskin file, I change line 6 from 1 to 2.
Step 3
Renaming The Lines In The .CMX File
After I paste the Neck-Wings lines, it's time to edit the .cmx file.
1. First I change line 6 to indicate the number of xskin files that are now associated with this
new mesh. This is VERY IMPORTANT, because if you forget to change this number, the
new mesh can not be read, and your game will crash. This is why I always do this FIRST!
Since this .cmx now contains a Pelvis and Neck xskin file, I change line 6 from 1 to 2.
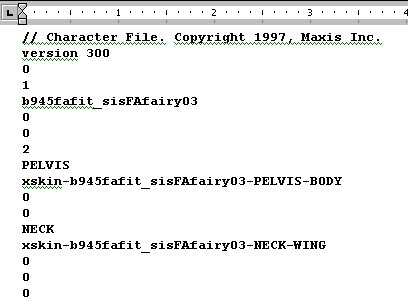
 2. I am essentially creating a new mesh by combining the two, therefore I am going to change
the file names in lines 3, 8 and 12. I have designated B945FAfit_sisFAfairy03 as the name of the
new .cmx file and have changed line 3 to correspond with this new file ID.
NOTE: This is NOT a completely unique mesh file name. I'm taking a chance that there is
no other female-adult-fit mesh with this same prefix if I plan to redistribute the skin on my fan
web site. For my personal use, this file will not over write any files in my game.
Unique file names will be discussed later in this tutorial.
3. Next, I change the file names in line 8 and 12 to match.
I have looked at some .cmx files that do not have the same file name in all corresponding lines.
Just remember, line 3 and 8 MUST match EXACTLY.
NOTE: Line 12 and any other lines of corresponding xskin files can be different names,
as long as all of the xskin files are located in the Skins folder, the PC should be able to identify
them, connect them to the .cmx file, and create the 3-D skin in the game. However, sometimes a
variety of different xskin files are rejected, the system can not read the files and the game crashes.
To be safe, to be compatible with all PC systems and to make my files easily identifiable, I name
ALL of the lines the same.
2. I am essentially creating a new mesh by combining the two, therefore I am going to change
the file names in lines 3, 8 and 12. I have designated B945FAfit_sisFAfairy03 as the name of the
new .cmx file and have changed line 3 to correspond with this new file ID.
NOTE: This is NOT a completely unique mesh file name. I'm taking a chance that there is
no other female-adult-fit mesh with this same prefix if I plan to redistribute the skin on my fan
web site. For my personal use, this file will not over write any files in my game.
Unique file names will be discussed later in this tutorial.
3. Next, I change the file names in line 8 and 12 to match.
I have looked at some .cmx files that do not have the same file name in all corresponding lines.
Just remember, line 3 and 8 MUST match EXACTLY.
NOTE: Line 12 and any other lines of corresponding xskin files can be different names,
as long as all of the xskin files are located in the Skins folder, the PC should be able to identify
them, connect them to the .cmx file, and create the 3-D skin in the game. However, sometimes a
variety of different xskin files are rejected, the system can not read the files and the game crashes.
To be safe, to be compatible with all PC systems and to make my files easily identifiable, I name
ALL of the lines the same.
 4. I select File>Save, and close the file. Remember, DO NOT select to SAVE AS at this point.
5. Lastly, I rename the file as noted in the lesson on Basic Renaming Of The Mesh Components
of a .cmx file.
Step 4
Editing The Xskin/Pelvis-Body File
This is a basic renaming the of Pelvis-Body file. After I edit, I Save, close the file and rename
the xskin file.
4. I select File>Save, and close the file. Remember, DO NOT select to SAVE AS at this point.
5. Lastly, I rename the file as noted in the lesson on Basic Renaming Of The Mesh Components
of a .cmx file.
Step 4
Editing The Xskin/Pelvis-Body File
This is a basic renaming the of Pelvis-Body file. After I edit, I Save, close the file and rename
the xskin file.
 Step 5
Editing the Xskin/Neck-Wings File
I will edit two parts to this file: the xskin file name line, and the bitmap file name for the wings
texture.
NOTE: All attachments have corresponding bitmaps. Often, a skinner will neglect to include
the bitmap or the attachment's xskin file (such as a picture of a flower and the xskin file
that is part of a cranium .cmx) when preparing a skin for redistribution and the attachment
does not show in the final skin. Often, this missing attachment will cause the game to crash.
Since the system has read the .cmx file and knows that there should be an attachment, when it
can not locate the file, the game doesn't know what to do, and CRASH!, you're looking
at your desk top!
The original bitmap name was bluechildwings:
Step 5
Editing the Xskin/Neck-Wings File
I will edit two parts to this file: the xskin file name line, and the bitmap file name for the wings
texture.
NOTE: All attachments have corresponding bitmaps. Often, a skinner will neglect to include
the bitmap or the attachment's xskin file (such as a picture of a flower and the xskin file
that is part of a cranium .cmx) when preparing a skin for redistribution and the attachment
does not show in the final skin. Often, this missing attachment will cause the game to crash.
Since the system has read the .cmx file and knows that there should be an attachment, when it
can not locate the file, the game doesn't know what to do, and CRASH!, you're looking
at your desk top!
The original bitmap name was bluechildwings:
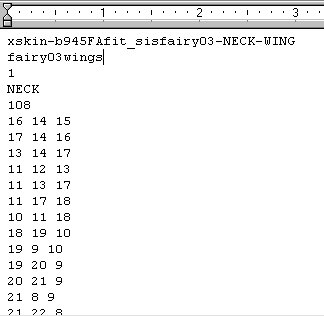
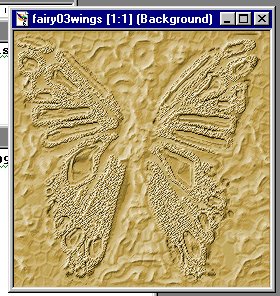
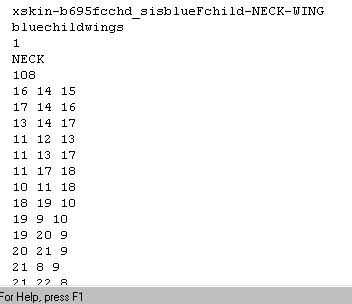 I am going to name the new wings bitmap, fairy03wings. I will create the new bitmap later.
I edit the rest of the file, Save, and rename the file as normal.
I am going to name the new wings bitmap, fairy03wings. I will create the new bitmap later.
I edit the rest of the file, Save, and rename the file as normal.
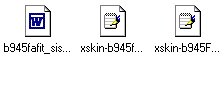
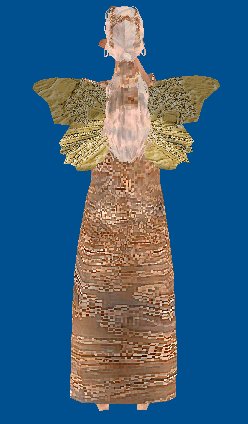
 Here are my newly edited mesh files.
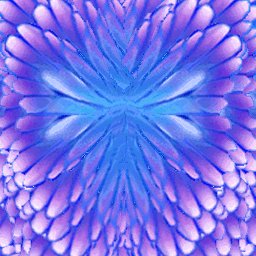
Creating The New Wings Bitmap
NOTE: The wings bitmap does not have to be an image of actual wings, unless that is what you
want. Since the bitmap will wrap onto the mesh form, and it's the mesh that is creating the 3-D
wing shape, you can use a picture of just about anything.
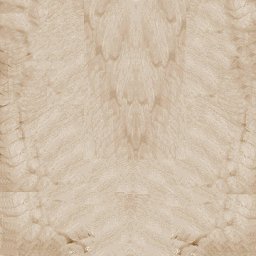
I have chosen to colorize and re-texture the the Blue Child Wings. I save as a 256 color bitmap,
256x256 pixels, with a file name of fairy03wings, in the Skins folder.
 Previewing and Checking The Edited Mesh File
I CUT and PASTE the new .cmx files into my Skins folder. Next, I renamed the B645FAFitlgt
bitmap to B945FAFitlgt so that I can preview the new mesh with a texture. Then, I load The
Sims Character Makeover to preview the skin (for instructions on using SimShow and The Sims
Character Makeover as a skin previewer, see previous section of tutorial).
The first time I chose the new .cmx file name, Character Makeover crashed, so, I knew there
was something wrong with my mesh files. When I double checked all of the lines that I
had edited in every file, I found that I DID NOT rename the file IDs EXACTLY the same
every time to match the .cmx file.
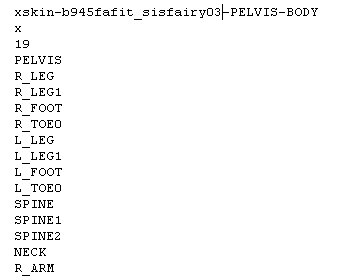
Compare the previous edited Pelvis-Body xskin file above with this one. Look very
carefully at the file name and you will see the error I made.
 After correcting my mistake and pasting the files once again into the Skins folder, I load the
Character Makeover and select the Body Mesh B945, and VIOLA! success!
After correcting my mistake and pasting the files once again into the Skins folder, I load the
Character Makeover and select the Body Mesh B945, and VIOLA! success!
 Click HERE to continue with Tutorial..... Click HERE to return to table of contents
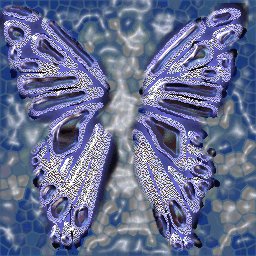 Angel Wings Spring Fairy Blue Child
Wings Wings
Sample of bitmaps used for wings
Angel Wings        Spring Fairy                 Blue Child
                                 Wings                        Wings

         Sample of bitmaps used for wings
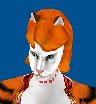 .CMX file and 3-D cranium mesh with tigress texture. There is no separate component for the pointy ears
to be attached to the cranium mesh.
.CMX file and 3-D cranium mesh with tigress texture. There is no separate component for the pointy ears
to be attached to the cranium mesh.
Adding Components (Attachments) To A Mesh
Prerequisite: Lesson-About Skin Files
                     Lesson-Basic Renaming of the Mesh Components

Please be sure that you have read and understand the previous sections of
this tutorial prior to attempting ANY combining of mesh files.

Update: There is now a new program that will attach single meshes to a .cmx file.  I have
yet try this tool and I am not endorsing it.   However,  since this is a user created tool that
is not supported by Maxis, I still recommend that you read this tutorial to understand how
to manually edit a .cmx file.

Introduction

The following instructions can be use to add any individual mesh (such as sunglasses or a cape)
to another mesh (such as a cranium or a body).  Before you try to combine meshes,
make sure that the object you want to attach to another  mesh IS indeed a separate mesh with
it's own file. For example, cranium mesh C201FA_WTiger by Aladrin Kelahn has pointy ears
that are part of the head mesh, not a separate mesh that is attached.  However, I was able to edit
C001FA_Mercedes, adding extended ears, by using a individual ear mesh by the same mesher.
You can not separate parts of a mesh on the original 3-D form.  You can only add
individual meshes as attachment.

In this example, I am going to add a wing mesh to a body mesh. In order to do this, since I do
not make meshes, I must use a body mesh by Maxis (or a user created mesh),
and a user created wing mesh.  I will take parts of an already existing mesh with wings, add them
to a already existing body mesh, and give the file names new identifications so that they will not
over write an existing file or crash the game.

NOTE: DO NOT use components of other meshes to create a new mesh unless you have the
permission of the original mesher.  It is all right to reuse Maxis files, but original mesh designs
BELONG TO THE ORIGINAL CREATOR! You are violating Copy Rights and Individual
Property Rights laws if you do!

In this example, the Wing mesh was created by Aladrin Kelahn (www.kelahn.com)
and the body mesh by Jerome of Sim Freaks (www.simfreaks.com).  Both used and edited by
permission.


Step One
Gathering The Necessary Files

There will be three files to this mesh: the .cmx file, the Pelvis-Body file, and a xskin file
designating where the wings will attach to the Pelvis-Body.  I have chosen to use body mesh
B645FAFit_JVDPR_nightdress2; and for the wings,  mesh B695fcchd_sisblueFchild (originally
B777fcchd_SmallWings).
                                                                 As always, I COPY  the necessary
                                                                 files from the Skins folder, and PASTE them into
                                                                 another folder so that I can edit them.