 |
| The FantaSim Tales How to..... Make A Skin By Sistergirl |
| So, you want to create a skin of your own for The Sims? Well, you came to the right place. I can tell you how to make this simple quicky skin to get you started. But, before I begin with the step-by-step instructions, there are a few things you should know first. |
|
| 1 Getting Started |
| Keep in mind, Ive been making skins for almost 18 months now. I did a lot of trial and error before the process became easy and I started making some decent skins. Using a few tricks and shortcuts, it can take me about an hour or less to get a satisfactory skin. If I start completely from scratch, or if the mesh is more elaborate, or if I want to have a more detailed skin, it can take several hours. My best advice before you even read a tutorial is to be familiar with your paint program. You don't have to be an expert on every feature, but having good hand-mouse control, knowing how to create layers, and knowing when to use the paint brush, eraser, the clone or any other useful tools or features (such as Edge effects) is very essential. You can jump to information about paint programs by clicking HERE. My second advice, read this and other tutorials thoroughly, and more than once so that you have an understanding about what is involved before starting your first skin. |
| a) Tutorials |
| I have found no one great tutorial. Some tutorials are hard to understand, still others give step-by-step instructions using one Paint program that you may or may not have. Modeling is not easy for the novice, and knowing how to model is important for a quality skin. So, I used a combination of information from the sites below and my own experimenting: http://clothmenagerie.wretched.tzo.com/ http://www.thesimsresource.com/tutorials/skinstutorial.phtml http://www.simgoddesses.com In addition, there was an official skin tutorial prepared by Sean Baity that I had downloaded when The Sims was released. This tutorial is now on my site and you can link there from HERE. |
| b) Software and Tools |
| The tools that you will need can be found under Downloads at The Sims Resource , http:// www.thesimsresource.com. You do not have to be a member to download these tools: Face Lift: This tool is used to create a cranium mesh. Also, there are some great bitmaps that you can use as a base for a head texture located in the Face folder. *This tutorial will not cover creating heads. I recommend using the tutorial at Sim Goddesses if you are interested in tips on making your own cranium textures. The Sims Character Makeover Studio: This tool will allow you to change the appearance of your Sim in the game. However, I like to use it for previewing the skin as I make it and for creating my final Jpeg images. SimShow: This tool is for previewing skins and importing files into the game. I will talk about it's use in the Troubleshooting section of this tutorial. It is recommended to use Body Warp to adjust the size of the cranium after making the mesh with Face Lift. However, I have yet to figure out how to use Body Warp, nor seen a good step-by-step tutorial on it. So, if a head mesh comes out too small, I just delete it and try making a new one. You'll find information about Body Warp in the other tutorials. |
| Note: Be sure to extract The Character Makeover Studio to The Sims folder or it will not load. Face Lift and SimShow are extracted to the Maxis folder. |
| Youll also need a good paint software. If you have Microsoft Windows, you already have a Paint program under Accessories, but it is a very simplistic program and cannot do what a more advance software can do. Some cheaper photo editor programs work just as well as a paint program. The other tutorials will talk more about this. However, dont go spend your money to buy a $100 software unless you are serious about making skins and other items for The Sims, or if youre planning on using it for other purposes. My advance paint program cost $80.00 (U.S.), but I use it for other purposes and its also used by other members in the family, so it was well worth the money. There are places where you can download a free version of a paint program. Use www.about.com as one resource to find these software sites. |
| c) Paint Software |
| My Software |
| I do most of my work using Broderbund Print Shop PhotoPro. It was the first photo editor I had and I was already familiar with it. When I wanted a more advance software, I bought Jasc Paint Shop Prothis is a very difficult program to use and Im still learning about it after a year. Certain effects and/or tools are easier on PhotoPro, so I go between the two programs when making a skin. To get a free 30-day trial verions of Jasc Paint Shop Pro, click HERE. For the purpose of this tutorial, I will use simple terms and talk about general features that any paint or photo editor should have. This way, you should not become confused if you are using a different software than I am. |
| d) Nude Bases |
| Lastly, you really should have a copy of the Nude Skin Bases. You can download these bitmaps at The Cloth Menagerie, http://clothmenagerie.wretched.tzo.com/. For convenience, extract the nude skin bases into the Skins folder. |
| 2 The Skin Files |
| Before we can start creating the skin, you must understand that a body or head skin has three files: one Texture file (the bitmap---what we call the skin), and two Mesh files (.cmx and xskin-.skn files). The mesh is the three-dimensional form that the flat skin texture wraps around to create the final product. Different file names are explained more in the Skin Tutorial from the official site and from The Sims Resource. To locate these files, follow this path after opening My Computer by double clicking the icons: C:>ProgramFiles>Maxis>TheSims>GameData>Skins If you use the View feature in the tool bar, and select Arrange Icons-By Type youll see the three category of skins. The bitmaps are first, then the .cmx files, and the x-skin files will be at the very bottom of the page. Here is an example of the three files for a top and shorts file by Maxis: B001FAFitlgt_Charcoal. bmp (the bitmap texture) B001FAFit_01.cmx (the first mesh file) x-skin-B001FAFit_01-Pelvis-Body (the second mesh file) You can view a mesh in The Character Makeover if there is not a texture with the same name. For example, this is the mesh to a C708 cranium by Fionn of Sim Freaks (www.simfreaks.com) and the B063 Maxis DJ body. You can view more textures in The Sims Skin folder under Texture. Also, in SimShow, look in the Texture folder. In Face Lift, look in the Face folder. Some textures and mesh files are compressed and hidden, so dont be surprise if you are looking for a mesh file to a texture, and you cannot find it. |
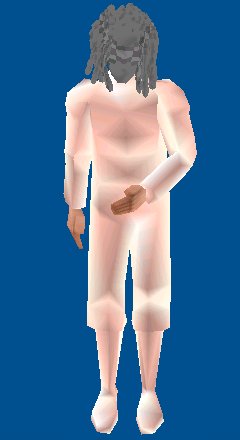 |
| Note: In the Character Makeover Studio, official meshes will always be white while user made meshes will be a solid gray with a check-board like patteren stripe running through it. |
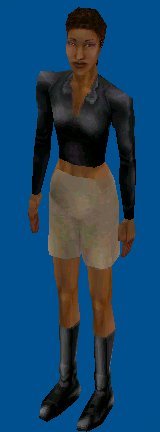
| This is a step-by-step on how I made a skinny female dark tone skin wearing a leather top, tan shorts, and boots. Before I begin, I look over the textures in the Skins folder (using the Preview feature of PsP or the Character Makeover Studio) to find the textures with the parts that I want to combine and modify . One way to view the texture is to double click the bitmap in the Skins. I chose the following textures: B013FAFITdrk_ltr (for the long sleeve leather top) B003FAFITdrk_ave2 (for the boots) Next, I look over the meshes. The mesh that will make a skinny female in shorts is B011FASkn. Lastly, I know that the original textures are named to wrap around a FIT female skin, however I will copy and paste the jacket and boots onto a SKINNY female nude skin base. |
| 3 Making A Quick Skin |
| a) Preparations |
 |
 |
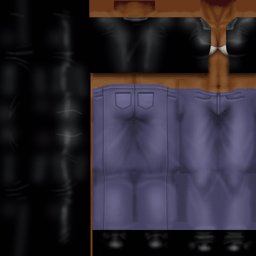
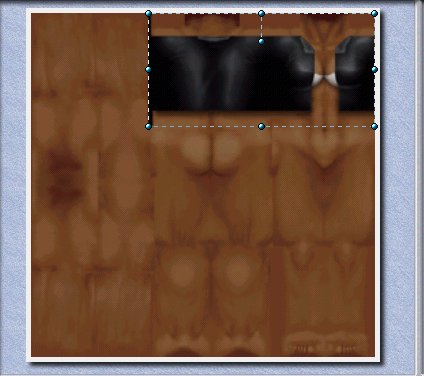
| 1. Open the B013 texture into the paint work space. Using a rectangle selection tool, select the complete top, and Copy the selection. If you have a multiple window paint program, leave this window open because you will return to copy the sleeves. Select the jacket top and copy. Paste to the nude base 2. Open the NFSkndrk_01 nude base texture and paste the top in the exact same place on the base. 3. Change the top: lengthen it to the waist and close the front. Here is where a Clone tool can become useful, but I also like to simply select part of the item and move it to the place where I want it by selecting the area, copy and pasting it to where I want it (some software programs allow you to "move" the selection without copy/pasting). Use whichever method feels comfortable or is easiest with your Paint program. Also, its a good idea to Zoom In so that you have a better view of what you are doing. |
 |
 |
| Click All Images For Closer View |
| Save your working texture in a temporary folder or on your desk top for right now. You can save it using any name, such as Trial1, and save in a bitmap format. I like to save several times as Im creating a skin and naming it different at each stage just in case I make a mistake and need to go back a step or two. |
| Most of the modeling is already complete on this leather top, but the breast area needs to be modified and the jacket completely closed. Adjusting the opacity as needed, use the Clone,the Erase, and the Paint Brush tools to model and blend the colors in the top. The Color Selector tool is handy to duplicate the color in the surrounding area as you are blending with the Paint Brush tool. Be sure to get rid of any lines and smooth out the shadows. Remember that this is a skinny body, so the highlights across the breast should not be as bright as on a fit body. When you have the top modeled to satisfaction, save. |
| b) Modeling The Jacket |
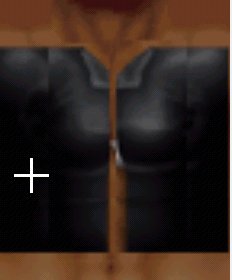 |
| Using the Cloning tool to blend. |
| Note: If you have a hard time getting the two sides of the body to look the same, simply model one side to your satisfaction. Then, use the move technique by selecting the good area, copy, paste and use the Mirror feature to Rotate the selection so that its facing the correct direction. |
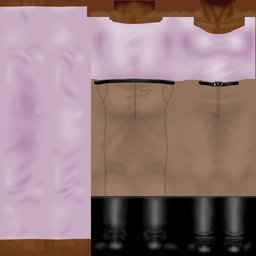
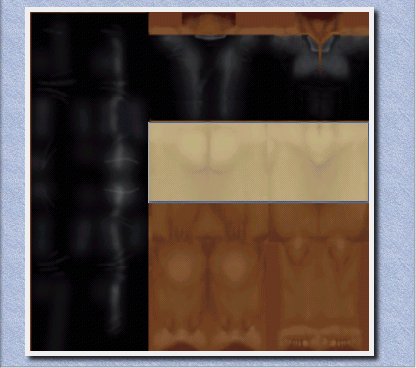
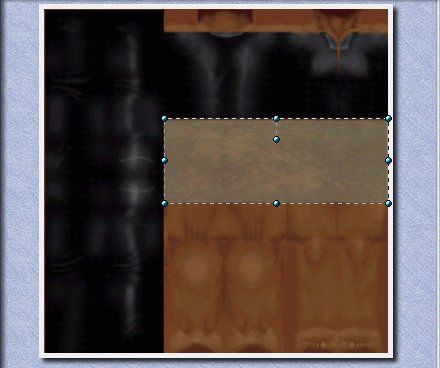
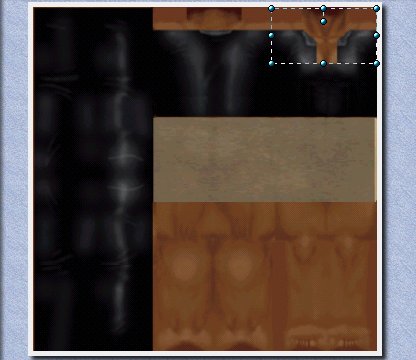
| 4. Copy and paste the sleeve area. No modifications need to be made. 5. Using the selection tool, create a rectangle on the nude base starting just below the jacket for the shorts. The length can be adjusted later, so for now make it to about mid-thigh. Fill in the rectangle with a light color in a medium opacity so that some of the bodys form is still revealed (in my example I used a pale yellow at 45%). Adding a light color for shorts. Adding a patterned layer. 6. Copy and paste a pattern layer on top of the solid color. This pattern can be of anything, i.e., cloth that you have scanned, a close up of a photo, samples from your Paint or other programs. I used the leather pattern that came with Jasc Paint Shop Pro. This second layer should also be at medium light to medium opacity; just dark enough to see the pattern, but light enough to still see the bodys form (my texture is at 43%). Save. 7. This is a good time for the first preview. Save the texture again, but this time SAVE AS a 256 colors (or 8 bit) bitmap using the correct name of the mesh file. You can keep the name trial tag on the end, since this texture is not complete: B011FAfskndrk_trial. Save this texture in the TheSims/Skins folder or it will not show in The Character Makeover Studio. |
 |
 |
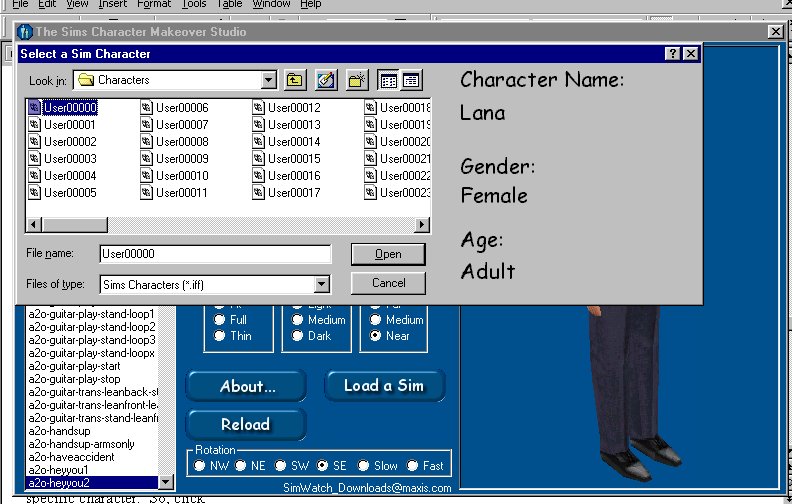
| c) Using The Character Makeover Studio |
| Open the Character Makeover Studio. When it is loaded, the default B004Mafitlgt_rat male body and C013Malgt_pompa male cranium will be in the view window. We want to find a womens skin to use to preview our trial texture on the chosen mesh. Select Load a Sim. The Select a Sim Character window will appear. This window has all of the characters that were ever created in your first neighborhood (User Data for neighborhood 1), even if the character no longer exists in the game. If you want to find a specific character in another neighborhood, you would use the up one level arrow and browse for the neighborhoods (User Data2, UserData3, etc.) Characters folder. For the purpose of previewing, any correct sex and age skin will do. Unfortunately, since the Character Makeover uses numbers for the characters instead of the given name, it is difficultt to locate a specific character. So, click the first number and the description will appear on the right hand column. As soon as you find an adult female, select ok. |
| Note: If you were using The Character Makeover Studio for the purpose it was created for, you would select a character from a neighborhood and you can change their body and their head as many times as you like. This is a great short cut if you are writing stories with more than eight characters. |
| Note: If you get an error message when selecting a skin (for example if the skin cannot be located), the Character Makeover will close. Re-load and choose another character. |
| Once open and loaded, select Thin Body Type, Dark Skin Type, then Body Mesh B011Faskn and Body Texture B011FASkndrk_trial. Rotate the skin so that you can take a look at it in all directions. Take a very close look to find any problem areas. These are the problems I found: 1) the jacket shoulders are too short and some of the skin is showing; 2) Im not satisfied with the front collar. Im going to put a V neck instead of the straight edge. |
| Note: Don't worry that you can "see" the short sleeves that is part of the original mesh. The sleeves will appear straight in the game. Often features of a skin have sharp edges, more shadows and are exaggerated in Character Makeover, but appear smoother and lighter in the game. |
| Note: If you didnt judge the length of the rectangle for the shorts as well as I did, you can either 1) select/copy/paste or move the rectangle, or 2) make select/copy/paste the legs from the nude base. |
| First preview. |
 |
| 8. Do not close the Character Makeover. Return to your paint and load the trial version that you are working on. 9. To put in a V neck, first select and copy the neck area from the original B013 skin. Paste on top of your working trial texture.. Pasting a new neck area. Selecting and rotating the collar. 10. Select half of the collar and rotate to the left or right so that you are creating a diagonal line for half of the V in the center. Do this on both sides. 11. Then, using the Erase, Clone, and Paint tool, blend in the new collar. If you get one side looking correct, use the select/copy/paste/"mirror" rotate method for the other side. Raise the lines of the shoulder to meet the edge of the skin base. When you are satisfied, save. |
 |
 |
| "Moving" a selected area. |
| Altered jacket before modeling. |
 |
 |
 |
| Note: Remember that you have a copy of this trial skin in the regular skin folder. So if you make a mistake, reload this copy to try again. Be sure NOT to overwrite this copy until you are ready to look at another preview. |
| I'm going to add a waist band to the top and a shadow at the bottom of the shorts. 12. Use the Color Selector to pick up the color of the shorts. Then, select a rectangle area for the band at the top of the rectangle (do not make the band too wide). Fill this in with the paint brush at 100% opacity. The color will look flat, but it will be modeled when the shorts are modeled. 13. I used the Darken color feature of my paint to fill in a thin band for a shadow at the bottom of the rectangle. Start the area selection just slightly in the short's rectangle and end just below the rectangle. Use a very light opacity. You want to create a light shadow. |
| d) Modeling the Shorts |
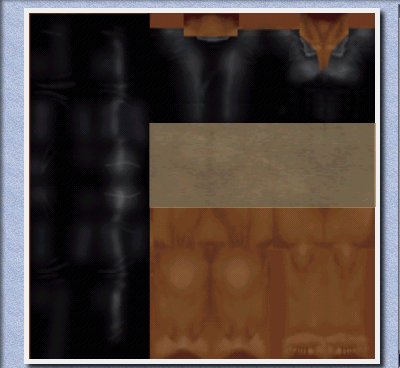
| Using the Color Selector tool, select the color of the medium gray in the jacket. Use this color to model the shorts: follow the contours of the buttocks (you still should be able to see the contours as a guide), the shadow below the buttocks, the belly area and between the front legs for the dark shadows. Follow the contours to create shadows on the waistband and at the lower part of the rectangle. For highlights, I used the Lighten color feature with the Paint Brush. You can also use white at a low opacity. Follow the contours of the left and right cheek of the buttocks and upper back thigh, the belly and the upper front thighs. Follow the highlight patterns of the jacket to create highlights on the waistband and lower shadows on the shorts. Save. |
| Note: Do not add shadows or highlights at 100% opacity. I have my Paint Brush tool set at 8% or lower and I build up the shadows slowly. Use the Eraser to tone down shadows that are too dark, highlights that are too bright, or to correct placement. |
| 14. Its time for another preview, so save, overwriting the B011 trial bitmap in the Skins folder as a 256 color bitmap. Return to the Character Makerover, and click Reload. The changes that were made will now show. 15. Go back and forth between your Paint program and Character Makeover to make any needed changes and to view the skin. In my case, I needed to adjust the back of the shoulder, the collar, and make the breast more symetrical. Also, put just a little bit of highlights on the breast area for the illusion of shiny material. Refer back to the original jacket, but remember that you are creating a skinny body texture. |
 |
| New "V" neck collar. |
| 4 Putting In The Finishing Touches |
| 1. Cut and paste the boots from B003. Save and take a look at your final texture in the Character Makeover. If you are not satisfied, add or modify until you are happy. Suggestions: add a necklace, color the legs to indicate stockings, add a design to the jacket, change the colors (you would need to lighten the jacket before you can color it using a "colorized" feature of your software).. I want to make the jacket a crop top, so I will select/copy/paste the stomach area from the nude base. 2. Now name and save the skin adding a unigue tag to the file name. For example, I will name the skin B011FAFitdrk_LthrwShSistergirl. Okay, go look at your skin in the game. |
| IMPORTANT: IF A MESH DOES NOT SHOW IN THE CHARACTER MAKEOVER, SEE TROUBLESHOOTING BY CLICKING HERE. |
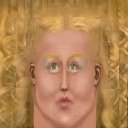
| Head texture be me using using Maxis' C002FA cranium mesh |
 |
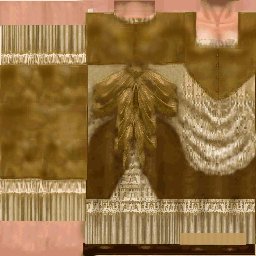
| This is one of my lastest head and body skins. It took several hours to make because of the complexity of the dress mesh and I wanted everything to be authentic. All patterns and textures were created by cloning or copy/pasting actual photographs of dresses and heads. Modeling was create using Broderbund Print Shop PhotoPro. Other effects and colors were created using Jasc Paint Shop Pro. Head mesh by Fionn and dress mesh by Jerome, both of Sim Freaks (www.simfreaks.com). |
 |
 |
|
Note: This is a tutorial for creating bitmap textures, not for making a mesh. For a tutorial on mesh making, visit The Skin Shop at http://skinshop.simprograms.com/
... |